Installing Spa
Welcome to the SpamShield Installation Tutorial, your comprehensive guide to enhancing your website's email verification and spam prevention capabilities. SpamShield is a robust add-on designed specifically for WoWonder, empowering your platform with the ability to:
- Block spam domains and disposable email addresses.
- Prevent the use of unwanted email extensions.
- Provide seamless email validation with advanced logic.
- Enhance security with a blacklist database of known spam sources.
This tutorial will walk you through the installation process step-by-step, from preparing your environment to configuring the plugin. Whether you are a seasoned developer or a beginner, this guide ensures a smooth installation experience.
Let’s get started and make your platform more secure with SpamShield!
Step 1: Upload the files.
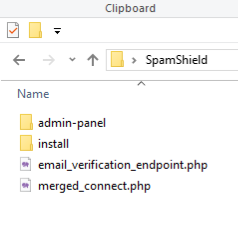
Download and upload the files to your wowonder root directory as shown in the picture.
Step 2: Run the installation script
Visit yoursite.com/install/install-spamshield.php
click the Confirm & Install blue button, when you see the green message, you are done. it should say
Installation completed successfully.
Step 3: Add the admin-panel pages (Please backup any file that you edit)
Now you must open and edit /admin-panel/autoload.php
now Look for
$pages = array(
    'general-settings',
after that add
	//SpamShield Start
	'add-spam-domain',
	'edit-spam-domain',
	'delete-spam-domain',
	'add-spam-extension',
	'edit-spam-extension',
	'delete-spam-extension',
	//SpamShield End
Look for (Around line 842)
<a href="#">
                            <span class="nav-link-icon">
                                <i class="material-icons">view_agenda</i>
                            </span>
                            <span>Manage Features</span>
                        </a>
After that add
						  <!-- ./ SpamShield Start -->
 <a href="#"><span class="nav-link-icon"><i class="material-icons">security</i></span>
 <span>SpamShield Settings</span></a>
<?php if ($is_admin || ($is_moderoter && $wo['user']['permission']['site-settings'] == 1)) { ?>
<ul class="ml-menu">
<li><a <?php echo ($page == 'add-spam-domain') ? 'class="active"' : ''; ?> href="<?php echo Wo_LoadAdminLinkSettings('add-spam-domain'); ?>" data-ajax="?path=add-spam-domain">Add Spam Domain</a></li>

	<li><a <?php echo ($page == 'add-spam-extension') ? 'class="active"' : ''; ?> href="<?php echo Wo_LoadAdminLinkSettings('add-spam-extension'); ?>" data-ajax="?path=add-spam-extension">Add Spam Extension</a></li>
 <?php } ?></ul>
 <!-- ./ SpamShield End -->
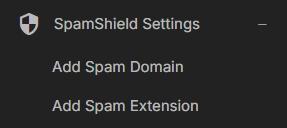
If you did everything correctly you should see this menu under the settings menu.
If you uploaded the files correctly you should not be able to add you settings.
Step 4: Now let's edit the themes files
I will start with wondertag because it is what I am using now.
in your wondertag themes/wondertag/layout/welcome/register.phtml
Look for
<?php $fields = Wo_GetWelcomeFileds(); ?>
<?php if (Wo_IsMobile() == false) { ?>
After that add
<? if (!empty($_POST['honeypot_field'])) {
    die("Bot detected.");
} ?>
This code detects and blocks bots by checking if a hidden form field (honeypot_field) has been filled. If it has, the script assumes it's a bot and stops execution with the message "Bot detected."
Look for Wondertag
	<label class="tag_field">
						<input name="email" type="email" autocomplete="off" placeholder=" " required>
						<span><?php echo $wo['lang']['email_address']?></span>
					</label>
Look for wowonder theme
	<label class="tag_field">
						<input name="email" type="email" autocomplete="off" placeholder=" " required>
						<span><?php echo $wo['lang']['email_address']?></span>
					</label>
Look for Sunshine theme
	<label class="tag_field">
						<input name="email" type="email" autocomplete="off" placeholder=" " required>
						<span><?php echo $wo['lang']['email_address']?></span>
					</label>
And replace with For wondertag
<label class="tag_field">
    <input name="email" type="email" id="email" autocomplete="off" placeholder=" " required>
    <span><?php echo $wo['lang']['email_address'] ?></span>
    <button class="btn btn-main btn-mat tag_wel_btn" type="button" onclick="verifyEmail()">Verify Email</button>
</label>
<div id="email-verification-status" style="color: red; font-size: 14px; margin-top: 5px;"></div>
And replace with for wowonder and sunshine
<label class="tag_field">
    <input name="email" type="email" id="email" autocomplete="off" placeholder=" " required>
    <span><?php echo $wo['lang']['email_address'] ?></span>
    <button class="btn btn-main btn-mat tag_wel_btn" type="button" onclick="verifyEmail()">Verify Email</button>
</label>
<div id="email-verification-status" style="color: red; font-size: 14px; margin-top: 5px;"></div>
In any theme look for
<span><?php echo $wo['lang']['confirm_password']?></span>
					</label>
and add the honeypot field
<input type="text" name="honeypot_field" style="display: none;" />Now go all the way down to the bottom of the page and right before the closing script tag
</script>Add this code
/*AntiSpam Shield Start*/
/*Add Delay antispam*/
$(function() {
    $('#register').submit(function(event) {
        if (working) {
            event.preventDefault();
            alert("<?php echo $wo['lang']['SpamShield_Please_wait_a_moment']; ?>");

            return false;
        }
        setTimeout(function() {
            working = true;
        }, 2000); // Add a delay of 2 seconds
    });
});


let emailValidated = false; // Track email validation status

function verifyEmail() {
    var email = document.getElementById('email').value;
    if (!email) {
        document.getElementById('email-verification-status').textContent = "<?php echo $wo['lang']['SpamShield_Please_enter_an_email_address']; ?>";
        document.getElementById('email-verification-status').style.color = "red";
        disableSubmitButton();
        return;
    }

    $.ajax({
        url: '<?php echo $wo["config"]["site_url"]; ?>/email_verification_endpoint.php', // Endpoint URL
        method: 'POST',
        data: { email: email },
        success: function(response) {
            if (response.valid) {
                emailValidated = true; // Mark as validated
                document.getElementById('email-verification-status').textContent = "<?php echo $wo['lang']['SpamShield_Email_is_valid']; ?>";
                document.getElementById('email-verification-status').style.color = "green";
                enableSubmitButton();
            } else {
                emailValidated = false; // Mark as invalid
                document.getElementById('email-verification-status').textContent = response.message || "<?php echo $wo['lang']['SpamShield_invalid_email_address']; ?>";
                document.getElementById('email-verification-status').style.color = "red";
                disableSubmitButton();
            }
        },
        error: function() {
            emailValidated = false; // Mark as invalid
            document.getElementById('email-verification-status').textContent = "<?php echo $wo['lang']['SpamShield_email_verification_failed']; ?>";
            document.getElementById('email-verification-status').style.color = "red";
            disableSubmitButton();
        }
    });
}

function enableSubmitButton() {
    document.getElementById('sign_submit').disabled = false;
}

function disableSubmitButton() {
    document.getElementById('sign_submit').disabled = true;
}

// Prevent form submission if email is not validated
$('#register').submit(function(event) {
    if (!emailValidated) {
        event.preventDefault();
        alert("<?php echo $wo['lang']['SpamShield_validate_email_first']; ?>");
        return false;
    }
});
/*AntiSpam Shield End*/


